
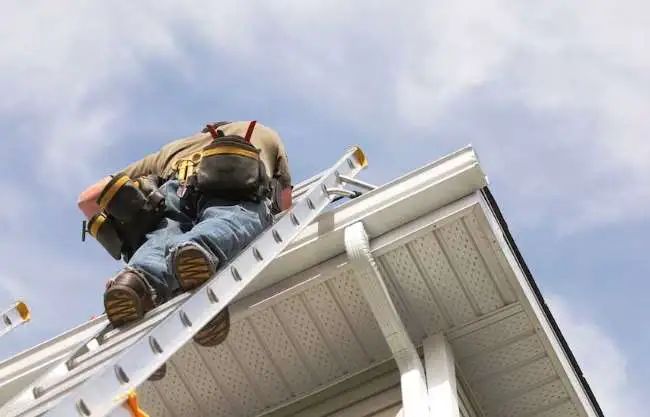
This commercial building in Elizabethtown, PA, has a flat EPDM rubber roof. Overall, it’s in great condition. However, the occupant is experiencing water penetration near this skylight.
The source of the leak was discovered: there is a hole in the curb of the skylight’s deck. Joyland Roofing Operation’s Manager, Kevin O’Connell, takes you through the process of repairing this leak.
Kevin here with Joyland Roofing. Out here on a commercial roof in Elizabethtown. We have a skylight curb leaking so I’m going to walk you through how to reflash that so that it’s not leaking anymore. I’m going to turn this camera around so I can show you the components and the tools you’re going to need to make this repair.
This is what you’re going to need:
- EPDM membrane cleaner
- Rag to clean the roof surface
- Uncured flashing tape
- Primer to seal tape
- Scrubbing pad to apply primer
- Seal roller to be used after the tape is applied
- Corner seal roller to be used in the corner of the curb
Prepare Roof for Flashing Tape
Clean the Rubber Roof Material
What we are going to do first is clean the whole area before we prime it and put the tape down. Be pretty generous with the cleaner and scrub it down really well and clean the rubber. It doesn’t matter how old the rubber is, even new rubber, you’re going to want to make sure to clean it before you use primer or any tape to it.
The tape is going to want to stick completely in all areas. We are going to want to make sure every nook and cranny is clean. As you can see, [the rag] is pretty dark.
Okay nice and clean. I am going to set the rag aside. The nice thing about membrane cleaner is that it dries pretty fast. Pretty much as soon as you’re done, it should be dry. Then, you can go ahead and start applying the primer.
Apply Primer
You want to make sure you don’t put the primer on too thick. Basically, you just need a skim coat over everything where there is going to be tape applied. You’ll want to let that tack up or flash off. It’s pretty sticky and goopy!
I’ll apply that on then start rubbing it in with the scrubbing pad. I start off with a little less primer than I think I need just so that I don’t put too much on because this has to dry to the touch so that it doesn’t come off on your finger.
This one you want to scrub in there and scrub hard. Really try to work it into the surface of the membrane.
Installing the Flashing Tape
While that’s drying, I’m going to hold this up, figure out what size piece of tape I need, and cut that.
What I want this to do – because of this curb, it’ll come on top of the curb, come down the side, and out onto the roof deck. Once I know what that length is, I can cut it.
Uncured (Form Flash) vs Cured Flashing Tape
This is called uncured flashing tape. That means it is stretchy, I can pull it, and it will allow me to flash around these corners and the inside corner out onto the roof deck. It won’t want to come back to its original shape, but it will form to that. Another term for it is form flash.
As opposed to if the tape was just running on top of something on one plane, that is called a cured cover tape. That tape is never going to be used to transition up a wall or around a corner because it’s cured and not stretchy. You can force it to go around a corner, but it will eventually pull up again.
Placing the Flashing Tape
With this flashing tape, we don’t want any squared corners where water and moisture can buck against it and try to peel it up. So, we are going to cut and round the corner off on all four sides. Be careful with scissors to not poke any extra holes in the membrane! So I’ve got my piece and it’s ready.
Most of the primer is pretty good. In the corner, it’s a little tacky and it’s coming off with my fingers. It really depends on the weather. If it’s damp or it’s humid in the air, whether that’s humid summer day or a damp day in the winter, it could take longer for the primer to cure and flash off so that it’s tacky but doesn’t come off on your fingers.
Alright, that looks good! What I’m going to do is I’m going to start to peel this backer tape off. I’m going to leave part of the backer tape on, I don’t want to get it stuck. Once this touches, it’s pretty much on there, and you don’t want to pull it off because you’ll have to start back at pretty much zero.
We are going to stick this on the top right where I want it to be. I’m going to push it down so it holds, then I’m going to start to work it down the wall. Come down slowly, I’m not going to let it go too fast. I’m going to let it work itself in there.
In the corner is where it’s most critical – as you can see that’s where the problem we are trying to fix. So I want to make sure that when I go in there, I want to make sure I’m right into the corner before I start coming out onto the roof deck.
A lot of times what I like to do is get it into that corner and hold it down there for a couple seconds, let it sit really well there in the corner before I start to pull the rest of the backer off onto the roof deck. There we go, we are in there.
Rolling the Flashing Tape to Seal
As I said, the corners are where it is the most critical! That’s where I’m going to start rolling it is in those corners and get that to form right in there. Get it nice and tight, let it hold in there before I roll the rest. We want to make sure we get all of it seated in there really well so it’s going to stick.
Anywhere that it might start to pull up, once it starts pulling up then it will keep pulling up over time. But, this tape will last a really long time. Good application on a good roof, this tape will last a good 20-30 years. It’s still good to keep an eye on it. Come up and check every year just to make sure you’re good and that everything was done properly to begin with, especially if there was any severe weather that could have affected it – make sure it all stays sealed.
We are going to roll it in there really good; pay close attention to the edges because that’s where it’s going to want to peel up. I’m going to hit this corner again just to make sure we stay solid in there. And there ya go!
This type of repair can be done pretty much anywhere. If you have a hole in the membrane, you can put a piece of flashing tape on there, as well. Any type of curb or penetration, there is a flashing tape for it. It doesn’t mean the roof is bad, it can be repaired!
Where Can I Buy These Materials?
Some of this stuff you can get at the Home Depot. It’s easier to look for a roofing supply store, they typically have better products.
You’ll need a membrane cleaner to clean this. You’re going to need a primer and that acts as a contact adhesive and the flashing tape and proper tools to do the repair. Great!
Talk to a Roofing Expert!
Lancaster County, Berks County, Dauphin County, York County, and more; at Joyland Roofing, we are here to serve you! If you have questions or would like an expert to look at or perform your leak diagnosis and repair, call us today.

John Esh | CEO & Master Installer
- 25+ Years Experience: From ground crew to Master Certified Installer.
- Local Roots: Serving Lancaster, Harrisburg, and SEPA since 1991.
- Credentials: GAF Master Certified (ME27586); Licensed in PA (PA124258) & MD (#137952).
- The "Why":
Obsessed with "radical transparency" to remove the fear factor from home improvements.
James Wesser | Content Producer
- Background: Former local news digital producer and journalist.
- The Mission: Turning complex roofing jargon into clear, "fluff-free" answers for homeowners.
- Local Tie: When not filming on-site, he’s likely roaming Hersheypark or building digital worlds.